Intro to DreamWeaver
How to Design a Website Using Dreamweaver
1. Start a New Site
The first step is to create a new site. For that, go to Site > New Site. It will get you to this screen:
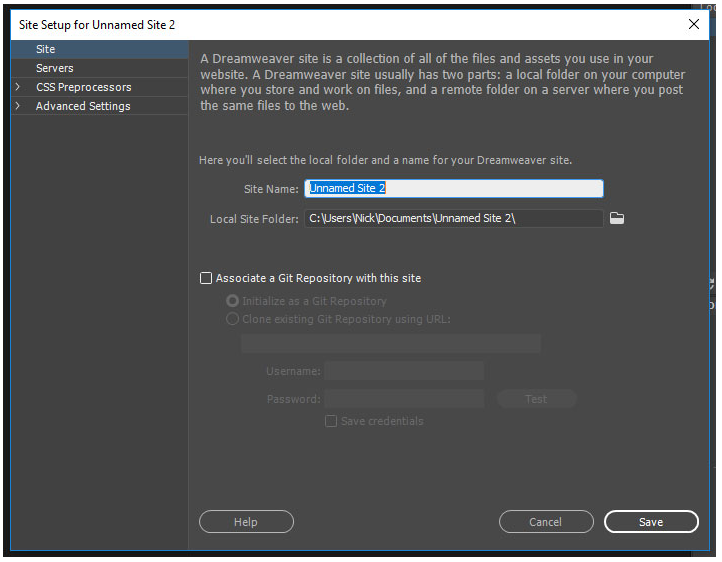
Give your site a name. Then, you need to choose where to save it (save to the desktop). Navigate to Local Info under Advanced Settings.

Click on the folder icon on the right where it says Default Images folder. Then go to your newly created site directory, open it, create a new folder called images and select that as your default folder (or if you have previously made a folder called Images within your root folder, select this folder). That way, Dreamweaver will save images associated with your site automatically there.
Click Save to go back to your workspace.
Click Save to go back to your workspace.
2. Create Your Homepage File
Now that you have created a project site, it's time for the first file. We will start with the homepage.
If Dreamweaver doesn't offer you the option by itself, go to File > New. You can either create a completely new file or use an existing template. The program comes with a few of those (see Starter Templates). However, we will create a new one instead.
If Dreamweaver doesn't offer you the option by itself, go to File > New. You can either create a completely new file or use an existing template. The program comes with a few of those (see Starter Templates). However, we will create a new one instead.
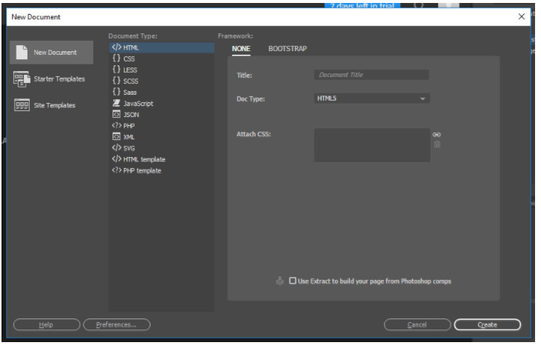
HTML is set by default and you can leave that as is. For document title, input index.html (ALWAYS CALL YOUR HOMEPAGE INDEX) and choose Create. This will leave you on the following screen:
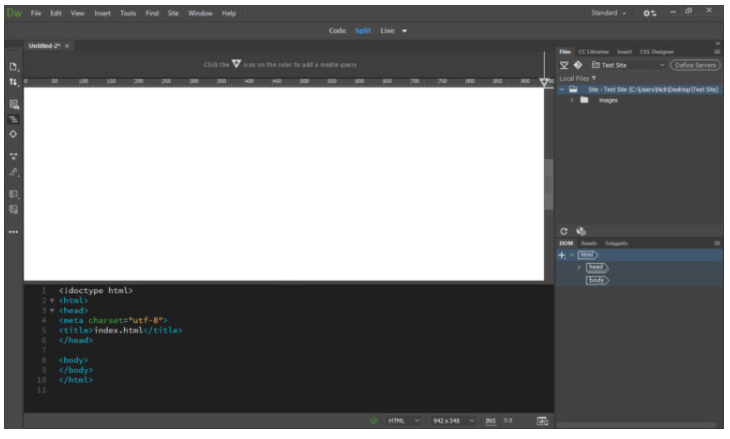
You will see a live view of what your site looks like (blank, at the moment) and the code behind it. You will also notice that Dreamweaver has automatically created some basic HTML markup that you can build on.
3. Create a Header
To insert an element into the page, you first need to choose it's location. For that, either click on the empty page (Dreamweaver will automatically choose the <body> element if you do) or place the cursor in the same element in the code portion of the screen.
After that, you need to head on over to the Insert tab in the upper right corner. This gives you a list of common HTML and site elements that you can add to your page. Scroll down until you can see Header as an option.
After that, you need to head on over to the Insert tab in the upper right corner. This gives you a list of common HTML and site elements that you can add to your page. Scroll down until you can see Header as an option.
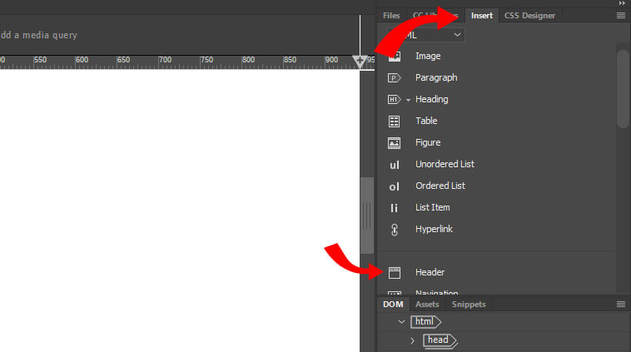
A simple click inserts it into the page. You also see it appear inside the HTML document.
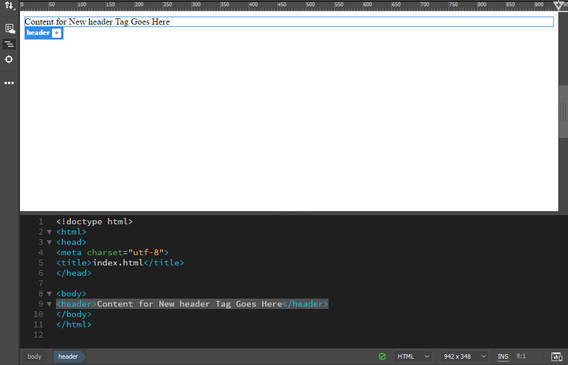
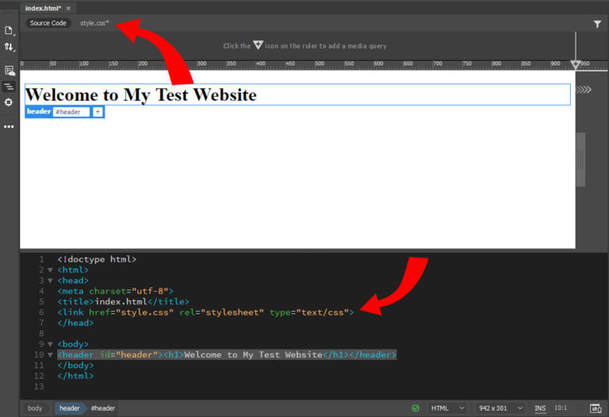
Now you will change the text inside the header and also turn it into a heading. For both, first mark the text in the code editor at the bottom.
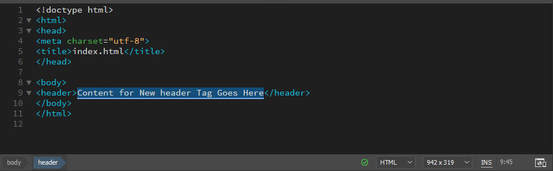
After that, go back to Insert, click on the arrow next to Heading and choose H1. This wraps the page title into an H1 HTML tag.
After that, you can type in a title for your page. Put Your Name as the heading for your website.
After that, you can type in a title for your page. Put Your Name as the heading for your website.

4. Create a CSS File
CSS is the part that provides all the styling on a web page. It allows you to define colors, dimensions of elements, font types and sizes and a lot more. We want to use the markup to spruce up our page title and also learn how to change CSS in Dreamweaver.
You can add CSS right inside the HTML document. However, that is a lot less elegant that what we will do, which is create a dedicated file for all the CSS styling of the entire site.
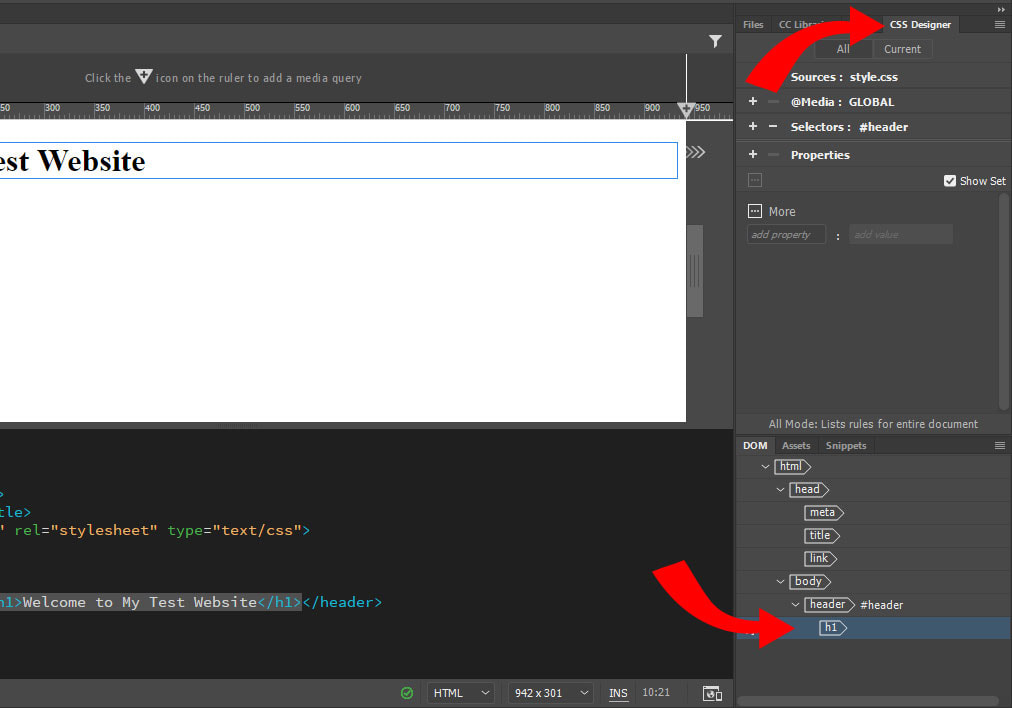
The first step to do so is to give your new header a CSS class or id. During that process Dreamweaver will also prompt you to create a style sheet file. So, go to the DOM menu in the lower right part of the screen that lists your entire site structure. Here, make sure your header is selected.
In the live view, you will now see it marked in blue with a little label and a plus sign at the bottom.
You can add CSS right inside the HTML document. However, that is a lot less elegant that what we will do, which is create a dedicated file for all the CSS styling of the entire site.
The first step to do so is to give your new header a CSS class or id. During that process Dreamweaver will also prompt you to create a style sheet file. So, go to the DOM menu in the lower right part of the screen that lists your entire site structure. Here, make sure your header is selected.
In the live view, you will now see it marked in blue with a little label and a plus sign at the bottom.
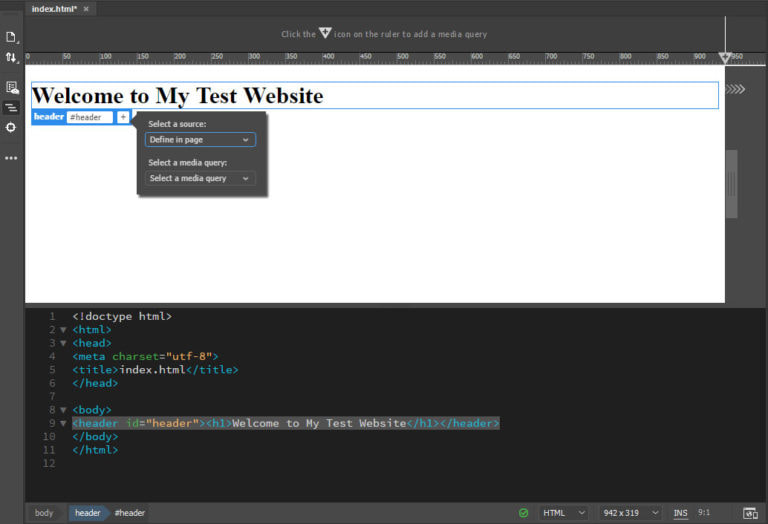
Click the plus sign and type in #header in the field that opens. The hashtag means you are assigning an id as opposed to a class. Press enter.
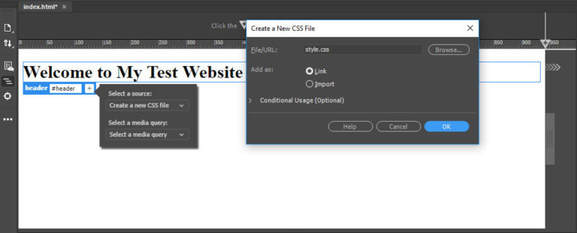
In the opening menu, instead of Define in page select Create new CSS file.
In the popup, choose Browse and navigate to your site folder.
Then type style.css (which is the standard name for style sheets) into the File name field and hit Save.
In the opening menu, instead of Define in page select Create new CSS file.
In the popup, choose Browse and navigate to your site folder.
Then type style.css (which is the standard name for style sheets) into the File name field and hit Save.
When you select Ok, a new file will appear at the top of your live view.
You can view and edit it from there. It will also be linked to in the <head> section of the HTML part of your page.
You can view and edit it from there. It will also be linked to in the <head> section of the HTML part of your page.
5. Create a CSS Selector for the Page Title
The first thing you want to do is change the font of your heading and also center it. For that, you first need to create new CSS selector. A selector is the name of an element on our page that you can assign properties like color, size, and more to.
To do so, mark your H1 heading in the DOM view on the lower right (like you did with the header before). Then, above that, choose CSS Designer.
To do so, mark your H1 heading in the DOM view on the lower right (like you did with the header before). Then, above that, choose CSS Designer.
To create a CSS selector, click on the line where it says Selectors and then click on the plus symbol.
This should automatically propose a selector to you named #header h1.
This should automatically propose a selector to you named #header h1.
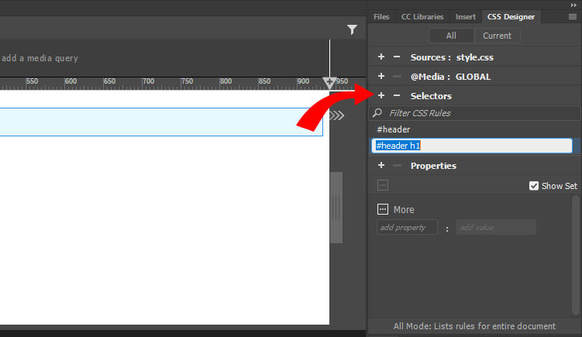
Hit enter to create it.
Quick note: this selector means that you are targeting the element named h1 inside the element called #header. That way, whatever you input as CSS is only applied to the written text only and not the header element overall.
Quick note: this selector means that you are targeting the element named h1 inside the element called #header. That way, whatever you input as CSS is only applied to the written text only and not the header element overall.
6. Change the Headline Font
Now that you have a selector, you can assign properties to it.
Stay in the CSS Designer menu and uncheck the box where it says Show Set. When you do, it will unlock a lot of additional options.
Stay in the CSS Designer menu and uncheck the box where it says Show Set. When you do, it will unlock a lot of additional options.

With the new buttons you can choose many CSS properties from the areas of layout, text, border and background.
Under More you may also input your own rules.
To change the font type, click on the Text option at the top (alternatively, scroll down). In the upcoming options, hover over font-family and click on default font.
Under More you may also input your own rules.
To change the font type, click on the Text option at the top (alternatively, scroll down). In the upcoming options, hover over font-family and click on default font.
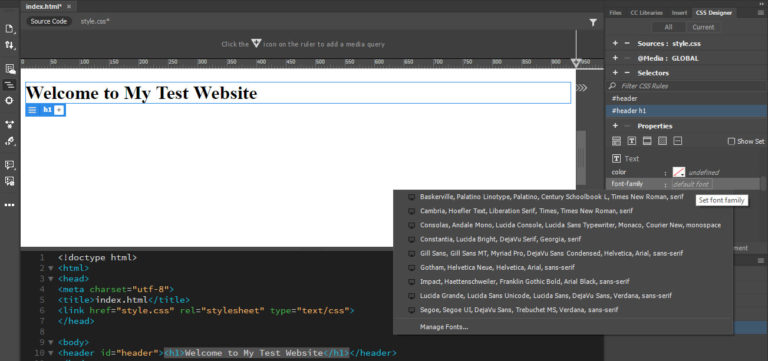
This will give you number of options for common fonts including their fallbacks (in case the user browser is unable to show the primary font).
Click on Manage Fonts at the bottom to get to this menu:
Click on Manage Fonts at the bottom to get to this menu:
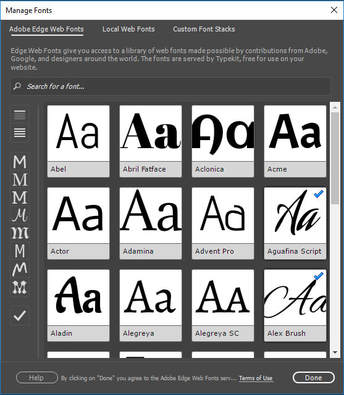
Here, you are able to choose free fonts from Adobe’s Edge Web Fonts service. Either search for a font by name or use the many filter options on the left to narrow down your choices until you find something.
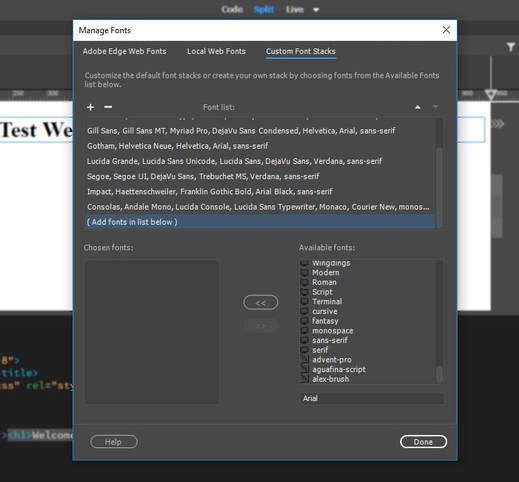
A click on any of the typefaces marks it for inclusion in Dreamweaver. Once you have done so, you can either use them directly or go to Custom Font Stacks to define your own fallback fonts.
A click on any of the typefaces marks it for inclusion in Dreamweaver. Once you have done so, you can either use them directly or go to Custom Font Stacks to define your own fallback fonts.
However, for now simply hit Done and then click on default fonts again.
This time pick your chosen custom font and voilá, the change is done including all necessary coding.
This time pick your chosen custom font and voilá, the change is done including all necessary coding.
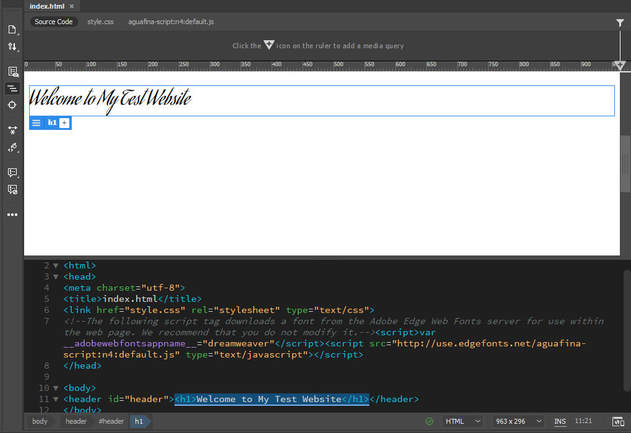
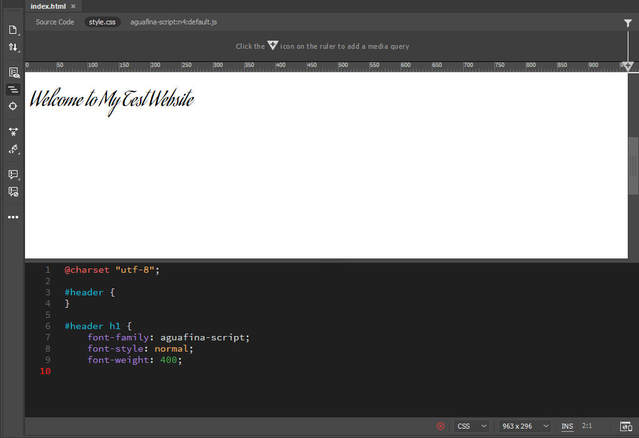
If you click on your style.css file at the top, you see that all markup has been added here as well.
7. Center the Headline and Change Its Size
The next task is to center it and increase the font size. For that, you can also use another feature called Quick Edit.
To use it, go to the code view and right click the part you want to edit. In this case, it's on the <h1> bracket.
To use it, go to the code view and right click the part you want to edit. In this case, it's on the <h1> bracket.
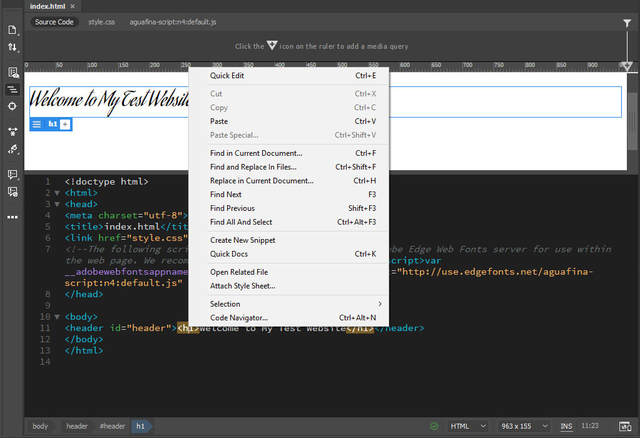
Here, choose Quick Edit at the top.
This will open the CSS associated with this element below it. Now you can input additional properties without having to search the entire style sheet file (which can get very long).
In order to center the text and make it larger, add the following code to it:
This will open the CSS associated with this element below it. Now you can input additional properties without having to search the entire style sheet file (which can get very long).
In order to center the text and make it larger, add the following code to it:

When typing, Dreamweaver will also make proposals for what you are trying to input, making it even easier. That's the code completion feature.
When you are done, it ends up like this:
When you are done, it ends up like this:
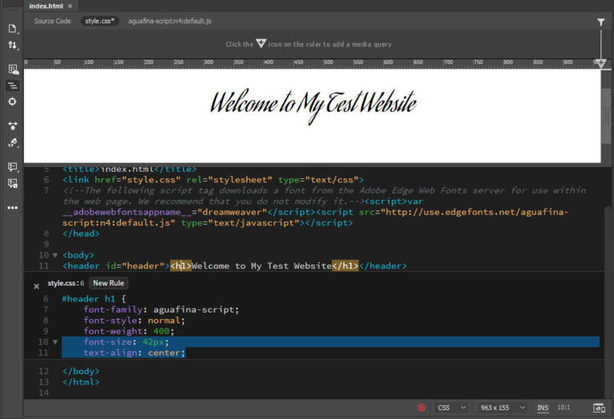
Note that the text has already changed in the live view.
Now, press Esc to leave quick edit and head over to the style sheet. You will find that the new CSS has been added in the appropriate place.
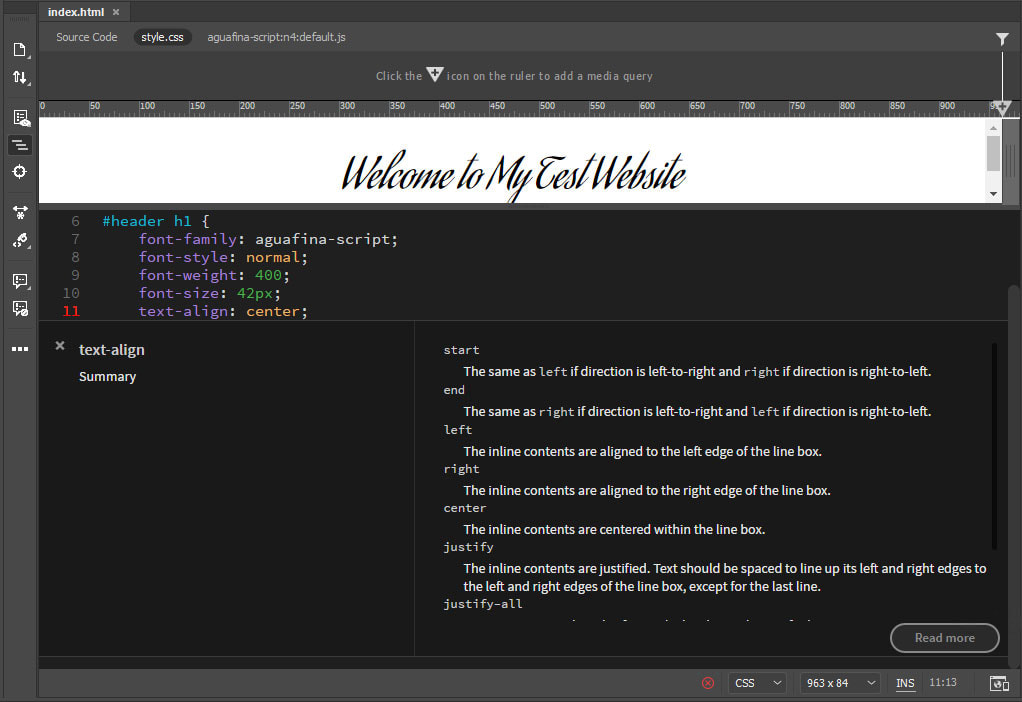
If you are ever unsure about what a CSS property means, simply right click it and choose Quick Docs (or press Ctrl+K). Dreamweaver will then give you an explanation.
Now, press Esc to leave quick edit and head over to the style sheet. You will find that the new CSS has been added in the appropriate place.
If you are ever unsure about what a CSS property means, simply right click it and choose Quick Docs (or press Ctrl+K). Dreamweaver will then give you an explanation.
8. Add more Content
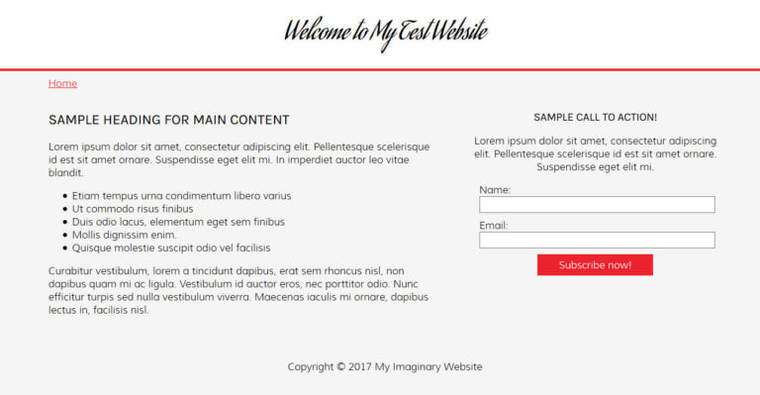
With what you have learned so far, you can now build a rudimentary site. For the sake of this Dreamweaver tutorial, I have done the following:
- Defined default fonts for headings and paragraphs
- Added a navigation bar and created a link to the homepage in it
- Added a div box for content with two more boxes inside
- Moved one of them left and one right with the float property
- Limited their width to percentages so they can align horizontally
- Added a sample heading and dummy text to the left including an unordered list
- Created a form (use the drop-down menu under Insert), two text fields and a submit button
- Added spacing around the elements via CSS margins and padding
- Provided background colors and borders
- Created a footer and a copyright message
Code for the Example: Since this is a bit advanced and not everybody will know how to do it, you find the the HTML and CSS below so you can reconstruct it for yourself. HTML and then the CSS:
|
| ||||
I want to use this as an example to show you the next steps. However, even if it seems complicated, I put this together the same way I showed you before.
9. Preview in Browser and on Mobile Device
To get started, click the real-time preview button in the lower right corner.
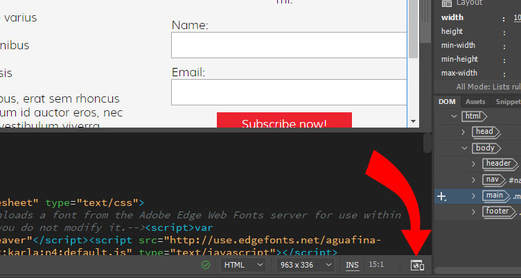
This will open the preview options.
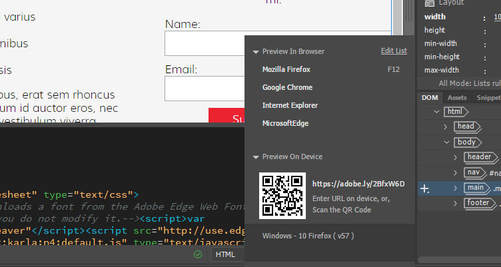
A click on one of the browser names will open your website project in it.
The best part: Any changes you make in Dreamweaver will automatically show up in the browser the moment you make them.
The best part: Any changes you make in Dreamweaver will automatically show up in the browser the moment you make them.
