2.01: Understand digital raster graphics
Use for Compare Aspect Ratio Size Activity: |
| ||
Aspect Ratio, Cropping & Selections Project
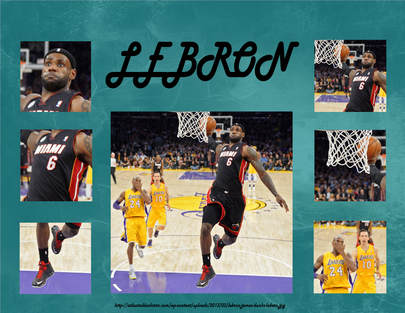
Every good designer knows that how you compose an image is one of the most important factors in creating dynamic works. One quality image may have any number of other images hidden inside, just waiting to be found. Pulling out parts of an image and placing them next to the original image is a great way to begin to understand the possibilities that exist within.
The key to this project is finding the right image. The image should have several stories to tell and has multiple areas of interest. Find an image that you can use for this project that is dynamic and has a high resolution (at least 800 or more pixels wide and tall) to allow you to show the hidden gems inside.
Directions:
- Search the Internet to locate a dynamic picture as described above. Save the picture to your computer as CropMaster.
- Open the image in Photoshop. Use the cropping feature and an aspect ratio of 4:5, crop the image create the best version of the big picture.
- Open the cropped image template above. Notice that the larger picture will go in the center and then smaller interesting pieces of the image will be pulled from it to surround the larger image.
- Move the cropped image from the CropMaster file to the template file. Position and scale the image so that it perfectly covers the larger rectangle. Remember to constrain proportions when scaling. Place a small italicized hyperlink reference below the picture.
- Now go back to the CropMaster file and using the rectangular marquee selection tool, with an aspect ratio of 1:1, make a smaller selection that shows an interesting facet of image. Move the selection from the CropMaster file to the template file. Position and scale the image so that it perfectly covers one of the smaller rectangles. Remember to constrain proportions when scaling.
- Repeat step 5, making new selections each time, until you have all six of the smaller squares covered. Remember to get each piece to fit perfectly over the rectangles.
- Use the Internet to search for “texture” under images. Find a texture with a high enough resolution that will complement your picture. Move the texture to your template file and place toward the bottom of the layers, so it will function as a background.
- Use the text tool to create a simple title, with an appropriate font, size, and color to enhance the project.
- Save the file as [LastName]Cropping.psd. Use the “Save As” command to save the project as a JPEG with the filename [LastName]Cropping.jpg
Layer Styles Activity
Directions:
- Create a new document with the dimensions of 8.5” x 11”.
- Use the type tool to put your first name, last name, or a nickname (school appropriate) on a layer. Change the font size to 72 pt and a font type of your choice. A thicker font type will work best for this exercise. Move the name toward the top left of your document.
- Duplicate the layer five times, so that you have a total of six name layers. Arrange them in two columns with three rows.
- Select the layer for the top left name and apply the following layer styles:
- Drop Shadow: Blend mode – Normal, Opacity – 100%, Distance – 10 px, Spread – 10%, Size – 10 px.
- Stroke: Size – 3 px, Color - #f8fb03
- Select the layer for the top right name and apply the following layer styles:
- Bevel and Emboss: With the Contour and Texture checkboxes selected. Accept all other defaults.
- Outer Glow: Color - # fb0338, Size – 15 px.
- Select the layer for the middle left name and apply the following layer styles:
- Stroke: Size – 5 px, Color - #000000.
- Gradient Overlay: Gradient type – Spectrum.
- Drop Shadow: Blend mode – Multiply, Opacity – 75%, Distance – 20 px, Spread – 0%, Size – 5 px.
- Select the layer for the middle right name and apply the following layer styles:
- Bevel and Emboss: With the Contour and Texture checkboxes selected. Accept all other defaults.
- Stroke: Size – 5 px, Color - #000000.
- Pattern Overlay: Pattern type – Tie Dye.
- Outer Glow: Color - # d243fc, Noise – 100%, Spread – 20 px, Size – 20 px.
- Drop Shadow: Blend mode – Multiply, Opacity – 75%, Distance – 20 px, Spread – 0%, Size – 5 px.
- Now create a set of styles of your own choosing for the bottom left name. Try to create a style that uses a variety of settings that go well together. When you are satisfied with your choices, before you click the OK button to apply the styles, click the New Style button and name the style as [YourLastName]Style1 and then accept all other defaults and click OK. The new style you just created will now appear as a thumbnail in the Styles panel for future use.
- Now create a second set of styles of your own choosing for the bottom right name.Try to create a style that uses a variety of settings that go well together. When you are satisfied with your choices, before you click the OK button to apply the styles, click the New Style button and name the style as [YourLastName]Style2 and then accept all other defaults and click OK. The new style you just created will now appear as a thumbnail in the Styles panel for future use.
- Save the file as [LastName]Styles.psd. Save the project as a JPEG with the filename [LastName]Styles.jpg.
2.02 - Understand Digital Vector Graphics
Essential Questions:
How does having an understanding of vector graphics impact design considerations when developing multimedia projects?
How can you use vector design software to create a range of illustrations?
What are the appropriate uses of raster and vector graphics?
How does having an understanding of vector graphics impact design considerations when developing multimedia projects?
How can you use vector design software to create a range of illustrations?
What are the appropriate uses of raster and vector graphics?
Illustrator in 60 Seconds: How to Create an Emoji Icon

We're going to quickly learn how to create a cute little emoji icon, using nothing more than some basic shapes that we're going to adjust here and there.
Click Here for the Tutorial
Click Here for the Tutorial
Working with Vector Effects
Open vectoraffects.eps and apply the effects below as directed. Tip: Make sure the Preview box is checked to see the results as you make changes. When completed, save the activity as [LastName]Effects.eps.
- Rectangle 1: Go to Effects – Warp – Bulge. In Warp Options, set Style to Vertical, Bend to -20%. In Distortion, set Horizontal to 0% and Vertical to 40%.
- Rectangle 2: Go to Effects – Warp – Bulge. In Warp Options, set Style to Vertical, Bend to 15%. In Distortion, set Horizontal to 0% and Vertical to 20%.
- Rectangle 3: Go to Effects – Warp – Arch. In Warp Options, set Style to Vertical, Bend to -40%. In Distortion, set Horizontal to 0% and Vertical to 40%.
- Rectangle 4: Go to Effects – Stylize – Round Corners and set the Radius to 20 px. Go to Effects – Warp – Arc. Arc Style to Horizontal, Vertical Distortion to 40%.
- Rectangle 5: Go to Effects – Warp – Arc Upper. Set the Arc Upper style to Horizontal, the Bend to 50%. In Distortion, set Horizontal to 0% and Vertical to -20%.
- Rectangle 6: Go to Effects – Warp – Bulge and set the Bulge Style to Vertical, Bend to -40, Vertical Distortion to 80.
- Rectangle 7: Go to Effects – Warp – Fish and set the Fish Style to Vertical, Bend to -40, and Vertical Distortion to 20.
- Rectangle 8: Go to Effects – Warp – Bulge. In Warp Options, set Style to Horizontal, Bend to 40%. In Distortion, set Horizontal to -40%.
- Rectangle 9: Go to Effects – Warp – Shell Upper. In Warp Options, set Style to Horizontal, Bend to 10%. In Distortion, set Horizontal to -10%.
- Rectangle 10: Go to Effects – Warp – Arc Upper. Set the Arc Upper style to Horizontal, the Bend to 20%. In Distortion, set Horizontal to 0% and Vertical to -5%.
- Additional: Pick any five of the above rectangles and go to Effect Stylize – Drop Shadow to add a variety of shadows to the shapes.
| vectoreffects.eps |
Draw a Summer Ice Cream Seamless Pattern in 10 Easy Steps
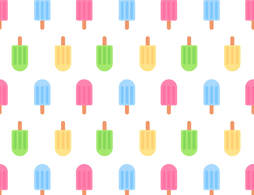
The best way to fight the summer heat is with a handful of delicious ice cream. While we won’t be learning how to make ice cream, we will be learning how to illustrate it. In this tutorial, we’re going to create a colorful ice cream seamless pattern using simple geometric shapes and handy functions in Adobe Illustrator. Let’s get cool!
- Topics Covered: Shape Building, Align Panel, Pattern Tool
- Estimated Completion Time: 15 Minutes
- Click here for the tutorial.
Create a Thanksgiving Illustration With Basic Shapes

Thanksgiving is here! In this tutorial, you will create a pilgrim character, bowl and roasted turkey in Adobe Illustrator. Using just simple shapes - it's easy, festive and fun.
Click here for the tutorial.
Click here for the tutorial.
Final Project - Create a Living Room Illustration
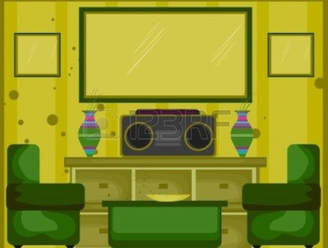
Use lines and shapes, the direct selection tool, stoke style and color, fills, gradients or textures, stacking order, the pathfinder, and warp effects. Use your vector software program to design a living room in which each item in the room is created by using available tools.
Some ideas for items for your room could be:
Sofa, Chair, Lamps or Ceiling Lights, Coffee Table, Flat Screen TV, Windows, Curtains or blinds, Vases, Flowers or plants, Book shelves with books, Mirror, Artwork on walls, Clock, Candles, or anything else you want.
You are required to make at least eight different items, but you can put as many more as you want.
Click here for inspiration. Need step by step help? Click Here.
When you are finished with your project, save the illustration as [LastName}LivingRoom.ai (or other available format). Once you have saved the illustration Export the file as a JPG called [LastName]LivingRoom.jpg.
